![]()
UCA install
How to install new UCA's Upper Control Arm lift kits. These are instructions that should apply to all Nissan Trucks from 1960 to 2004 2wd and 4wd including 521, 620, 720, d21 and d22. Wd21 Pathfinders from 1987 to 1995 and Wd22 Xterras from 1999 to 2004. I have installed UCA's on 2 of my 85 720 trucks. The allow remove down travel and correct caster and camber alignment issues. You will probably need to re index your T bars if not already done so.
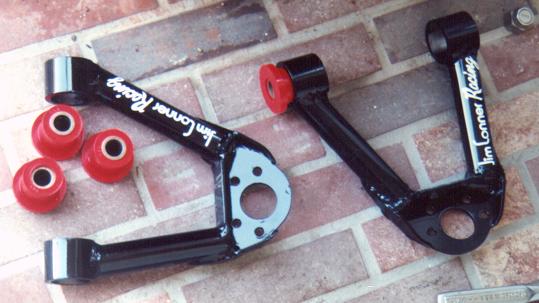
These were my 85 720 2wd UCAs. Note no down travel stops like the 4wds have
Instructions for all but Xterra and Frontier, see below.
- Measure the height from the center of the wheel at the fender to the ground and record this measurement for future use. If your front end is sagging abit (normal) You may get more than 3 inchs of lift. Or what ever UCA manufacturer claims.
- Raise the front of the vehicle of the vehicle and place jack stands under the frame directly below the motor mounts. This is where the lower a arm connects to the front cross member.
- Remove the front tires.
- Remove the stock shocks.
- Remove the 4 upper ball joint connecting bolts.
- Remove the 2 upper bolts that connect the A arm to the frame. save the stock space shims. You should have 1 per bolt. All the U shaped shims are not stock and can be discarded. You will need to re align front end when done. These shims control caster and camber, the new A arms and the "tightening of the torsion bars will destroy the current specs.
- Now the Upper A arm should be free from the vehicle. Remove the 2 nuts and washers from the crossbar.
- Using a 2 or 3 jaw gear puller remove the bushing presses into the upper a arm. Or take to a machine shop and have them presses out.
- Remove the stock bump stops if you receive new ones with kit. Not common to get new ones. If you have downtravel limit stops. 720 2wd do not for example. You can replace with thinner poly versions for more travel.
Assembly:
- Install crossbar and new Urethane bushing into New A Arm and tighten nuts.
- Install A Arm on vehicle.
- Re install 4 ball joint to UCA bolts.
- Re install 2 Frame connecting bolts with the stock washer type shims.
- Install New shock.
- re Index the torsion bars. (see my other page)
Frontier and Xterra UCAs.
- Measure the height from the center of the wheel at the fender to the ground and record this measurement for future use. If your front end is sagging abit (normal) You may get more than 3 inchs of lift. Or what ever UCA manufacturer claims.
- Raise the front of the vehicle of the vehicle and place jack stands under the frame directly below the motor mounts. This is where the lower a arm connects to the front cross member.
- Remove the front tires.
- Remove the stock shocks.
- Remove the 1 upper ball joint connecting nut.
- Remove the 2 upper bolts that connect the A arm to the frame. You will need to re align front end when done. These bolts control caster and camber.
- Now the Upper A arm should be free from the vehicle.
- You can replace with thinner poly versions for more travel.
Assembly:
- lube and Install bushings into UCA.
- Install A Arm on vehicle.
- Install new ball joint to UCA with the 4 bolts provided.
- Re install 2 Bolts and adjustment shims.
- Attach ABS wire to UCA.
- Install New shock.
- re Index the torsion bars. (see my other page)
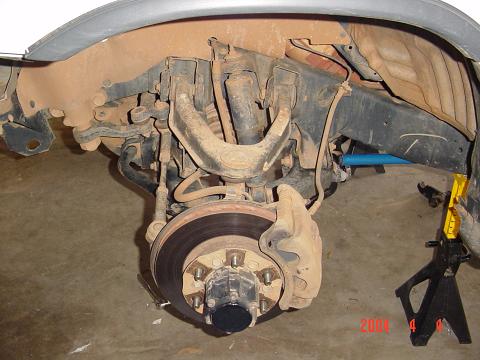
Stock
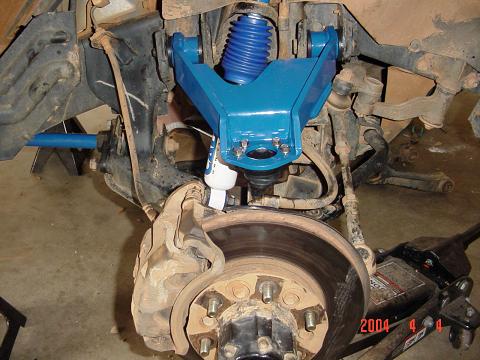
3" lift UCAs and new shocks and T bars. All Cal Mini